Christmas Bark: The Easy Christmas Dessert
If you’ve ever found yourself googling “easy Christmas dessert to make last minute” on December 24th… you’re in the right place.
Christmas bark is that dessert:
- Minimal dishes
- Looks festive and impressive
- Tastes like something you bought from a fancy chocolatier
You’ll learn exactly how to make Christmas bark, plus variations, storage tips, and ideas for gifting and serving. By the end, you’ll have a go-to recipe you can reuse every single holiday season.
What Is Christmas Bark?
Christmas bark (also called holiday chocolate bark) is a thin layer of melted chocolate topped with festive ingredients, then chilled and broken into rustic pieces.
- Think of it as:
- A chocolate bar
- A candy
Most versions include:
- A base of dark, milk, white, or layered chocolate
- Crispy or crunchy elements (biscuits, pretzels, nuts, candy)
- Festive colors (red, green, white, gold sprinkles)
It’s ideal for:
- Christmas dessert trays
- Edible gifts for friends and co-workers
- Kids’ holiday activities
- Last-minute desserts
Why You’ll Love This Christmas Bark Recipe
This Christmas bark recipe is designed for real life, not just Pinterest-perfect photos.
You’ll love it because it’s:
✅ Beginner-friendly – perfect recipe for everyone to make
✅ Customizable – mix and match toppings with what you already have
✅ Quick – 10–15 minutes of active prep, then it chills in the fridge
✅ Make-ahead friendly – keeps well, so you can prep days before Christmas
Key Ingredients for Christmas Bark
You don’t need anything fancy. The base of a great Christmas bark is good chocolate and contrasting textures.
1. Chocolate Base
Choose one or a mix:
- Dark chocolate (50–70%): richer, less sweet, elegant
- Milk chocolate: creamy, kid-friendly, classic
- White chocolate: sweet and festive, perfect for the top layer
Tip: Use chocolate bars or high-quality chocolate chips. Baking chocolate or cheap candy melts can taste waxy and not melt smoothly.
For a standard batch (about 20–24 pieces):
- 300 g (10.5 oz) dark chocolate
- 200 g (7 oz) white chocolate
You can adjust the ratio to taste.
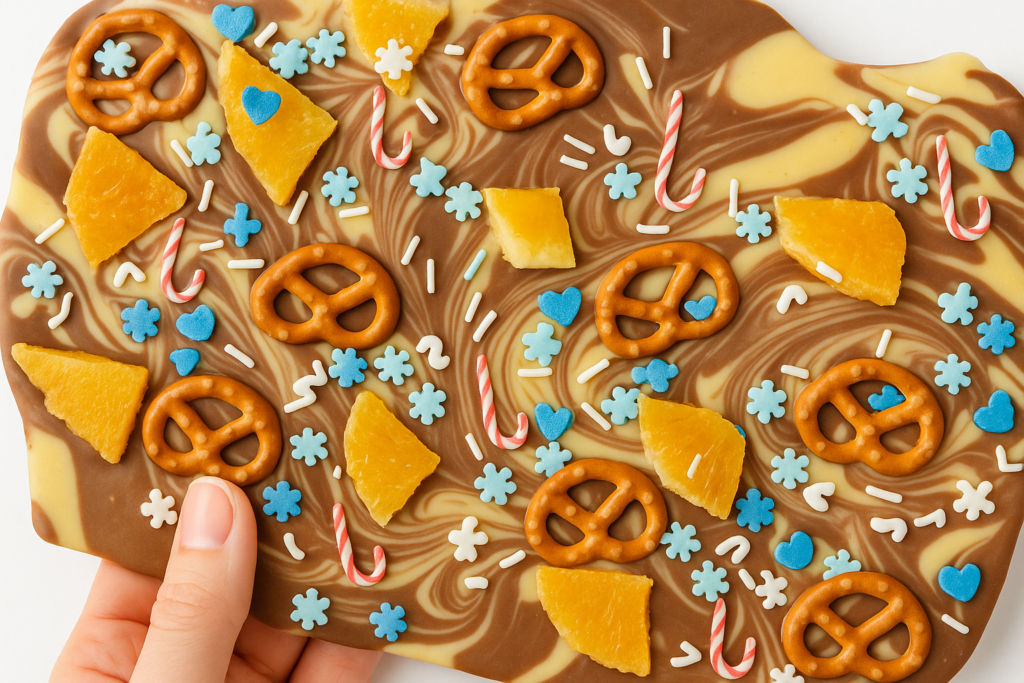
2. Crunchy & Festive Toppings
Here are classic toppings that make your Christmas bark look and taste “holiday”:
- Crushed candy canes or peppermint candies
- Mini pretzels or pretzel sticks (crushed slightly)
- Festive sprinkles (red, green, white, gold)
- Crushed biscuits/cookies (digestive, graham crackers, speculoos, Oreos)
- Nuts (pistachios, almonds, hazelnuts, pecans – roughly chopped)
- Dried fruit (cranberries, cherries, or apricots for a chewy bite)
You don’t need all of these. Pick 3–4 toppings and sprinkle them generously.
Aveline’s Christmas Bark Video 👇
Detailed Step-by-Step: How to Make Christmas Bark
This method works for almost any flavor combo you want to try.
Tools You’ll Need
- Baking tray (about 20×30 cm / 9×13 in works well)
- Parchment paper or silicone baking mat
- Microwave-safe bowl or oven
- Spoon, spatula, or small offset spatula
- Knife or your hands (for breaking the bark later)
Step 1: Prepare Your Tray
- Line your baking tray with parchment paper or a silicone mat.
- Make sure the paper goes up the sides slightly – this will make it easier to lift the bark out later.
Texture tip: If you prefer a thicker bark, use a smaller tray or don’t spread the chocolate all the way to the edges.
Step 2: Melt the Chocolate (Without Burning It)
You can melt chocolate in two main ways:
Option A: Microwave (Fast & Easy)
- Chop the chocolate into small pieces (if using bars).
- Place in a microwave-safe bowl.
- Heat on 50% power for 20–30 seconds at a time, stirring between each round.
- Stop when the chocolate is mostly melted and silky; the last small pieces will melt with residual heat as you stir.
Option B: Oven
- Heat oven to 50 degrees Celsius, warm up for 15 minutes and then place the tray inside the oven.
- Leave the tray inside the oven for 10 minutes and then remove.
Helpful guide: melting chocolate.
Important: Ensure to not raise the temperature over 50 degrees Celsius in the oven as it will burn the chocolate.
Step 3: Spread the Chocolate Base
- Pour the melted dark (or milk) chocolate onto the prepared tray.
- Use a spatula to spread it into an even layer about 3–5 mm thick.
- Gently tap the tray on the counter a few times to release air bubbles.
If you’re doing a two-layer bark (dark + white):
- Spread the dark layer first and let it set very slightly (2–3 minutes at room temperature or 1–2 minutes in the fridge) before adding the white chocolate on top.
Step 4: Add the White Chocolate & Swirl (Optional but Pretty)
If using white chocolate:
- Melt the white chocolate using the same method as above.
- Drizzle it over the dark chocolate in lines or random blobs.
- Use a toothpick, skewer, or knife tip to gently swirl the two chocolates together for a marbled effect.
Don’t over-swirl or the colors will blend into a muddy brown. A few gentle figure-8 motions are enough.
Step 5: Add the Toppings (The Fun Part!)
While the chocolate is still soft:
- Sprinkle on your chosen toppings evenly across the surface.
- Aim for a good mixture so every piece of bark gets some chocolate, crunch, and color.
Topping idea combo (balanced & festive):
- Crushed candy canes
- Chopped pistachios (for green color)
- Dried cranberries
- Red and green sprinkles
Gently press the toppings into the melted chocolate with your hand or the back of a spoon so they stick once the bark sets.
Step 6: Chill Until Set
Place the tray in:
- The fridge for 20–30 minutes, or
- A cool room for 45–60 minutes
The bark is ready when:
- The surface looks matte (not shiny)
- It feels firm to the touch
Step 7: Break into Pieces
Once fully set:
- Lift the bark out of the tray using the parchment paper.
- Place it on a cutting board.
- Break it into pieces with your hands for a rustic, jagged look,
or cut into neat squares/triangles with a sharp knife.
You now have a beautiful batch of Christmas bark ready to serve or gift. 🎄

Christmas Bark Recipe
Ingredients
Method
- Line a baking tray with parchment paper or a silicone mat. Smooth it out so the chocolate spreads evenly.
- Chop chocolate into small pieces and use a microwave or oven to melt the chocolate.
- Avoid letting any water or steam touch the chocolate.
- Pour the melted chocolate onto the lined tray and spread it into an even layer about 3–5 mm thick.
- Melt white chocolate the same way.
- Drizzle over the dark layer and gently swirl using a toothpick or knife tip. Do not overmix.
- Sprinkle candy canes, nuts, dried fruit, sprinkles, pretzels, or other toppings evenly across the surface.
- Lightly press them into the melted chocolate so they adhere.
- Transfer the tray to the fridge for 20–30 minutes, or let it set in a cool room for 45–60 minutes.
- The bark is ready when firm and no longer shiny.
- Lift the bark from the tray using the parchment paper.
- Break into rustic pieces or slice into neat squares with a sharp knife.
Notes
Flavor Variations & Ideas
Once you understand the basic method, you can create endless variations to suit your taste or whatever you have in the pantry.
1. Classic Peppermint Christmas Bark
- Dark + white chocolate layers
- Crushed candy cane
- White sprinkles
This one tastes like a peppermint hot chocolate in candy form.
2. Salted Caramel Pretzel Bark
- Milk chocolate base
- Crushed mini pretzels
- Drizzle of caramel sauce
- A pinch of flaky sea salt
Perfect for dessert tables where people love sweet-and-salty combos.
3. Nut Lover’s Christmas Bark
- Dark chocolate base
- Mixed chopped nuts (pecans, pistachios, almonds, hazelnuts)
- Optional: sprinkle of sea salt
This version feels more “adult” and less sweet.
4. Kids’ Sprinkle Explosion Bark
- White or milk chocolate base
- Colorful sprinkles
- Mini marshmallows
- Crushed biscuits or cookies
Let kids add toppings themselves – it’s a fun Christmas activity.
5. “Everything but the Stocking” Bark
Use leftover:
- Cookies
- Chocolate bars
- Nuts
- Caramel candies
- Seasonal biscuits
Chop them up and sprinkle over your chocolate base. It’s a great way to use up bits and pieces.
Tips for Perfect Christmas Bark Every Time
To help your Christmas bark turn out smooth, shiny, and snappy, remember these tips:
- Use good quality chocolate. The flavor and texture really depend on it.
- Melt slowly & gently. High heat burns chocolate and makes it grainy.
- Don’t rush the swirl. A few gentle motions create a prettier pattern than vigorous mixing.
- Press toppings in. If they sit on top without contact, they’ll fall off when you break the bark.
- Watch the thickness. Too thin and it snaps into tiny shards; too thick and it’s hard to bite. Aim for 3–5 mm.
- Let it fully set. Cutting or breaking too early creates smeared edges and soft centers.
How to Store Christmas Bark
Christmas bark is very storage-friendly, which makes it perfect for make-ahead holiday planning.
Room temperature:
- Store in an airtight container in a cool, dry place.
- Lasts: about 1–2 weeks, depending on toppings.
Refrigerator:
- Ideal if your kitchen is warm.
- Lasts: up to 3 weeks.
Freezer:
- Yes, you can freeze it. Wrap well and put in an airtight container.
- Lasts: up to 2–3 months.
If using candy canes, note that they can soften a bit over time, especially in the fridge. The bark will still taste great, but the texture may change slightly.
How to Serve Christmas Bark
Here are a few ideas to present your Christmas bark so it feels extra special:
On a Christmas dessert platter
- Mix it with cookies, truffles, and fresh fruit.
In clear bags or jars as gifts
- Fill small bags or jars with bark pieces
- Tie with a ribbon
- Add a handwritten tag (e.g., “Merry & Sweet Christmas Bark”)
On a hot chocolate bar
- Place bark in a bowl beside mugs of hot chocolate so guests can snack or crumble it on top.
On the Christmas table
- Use it as a simple dessert after a heavy holiday meal – everyone can just grab a piece.
For more yummy desserts, click here.
Christmas Bark FAQ
Yes. You can use only dark or only milk chocolate. White chocolate is optional but gives a nice color contrast.
It was probably overheated or came into contact with water. Heat it more gently next time and avoid steam or water drops.
Yes – use dairy-free vegan chocolate and check toppings (some sprinkles and candies may contain milk).
You can safely make it up to 1–2 weeks in advance if stored in an airtight container in a cool place.
Store the bark in an airtight container and avoid humidity. For longer storage, refrigerate or freeze in a sealed container.